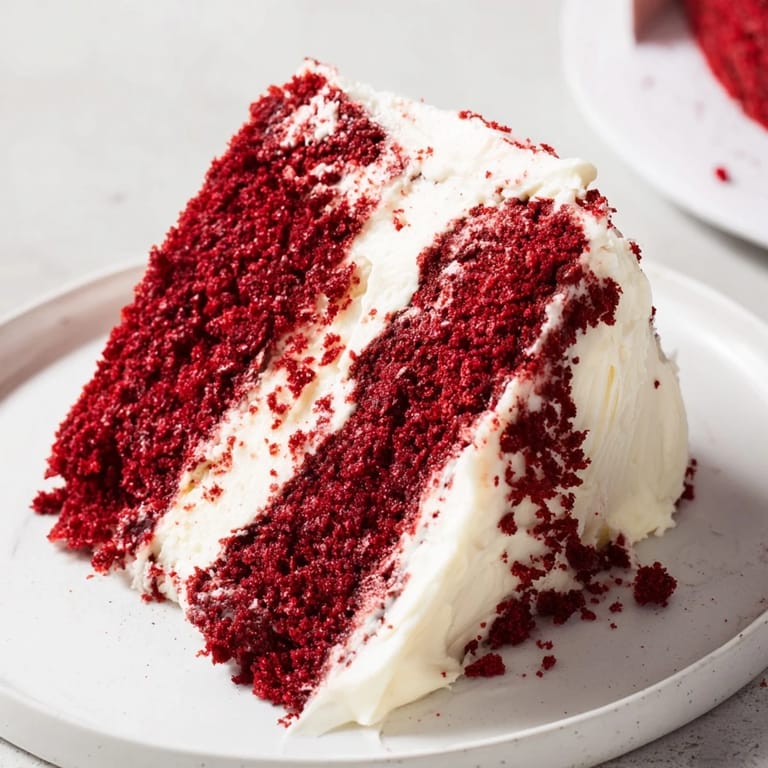
 Save to Pinterest
 There's something about red velvet cake that stops conversations mid-sentence. My grandmother kept the recipe written on an index card, stained with decades of butter splatters, and made it only for occasions that mattered—weddings, anniversaries, the kind of days you wanted to remember. The first time I tried making it myself, I was convinced the red food coloring would turn muddy or look artificial, but the moment that batter hit the pan, I understood why she kept that card close. It's not just chocolate cake dressed up; it's a flavor that whispers rather than shouts, tender and slightly tangy, with the kind of cream cheese frosting that makes you pause between bites.
I made this for my best friend's engagement party three years ago, and I remember standing in the kitchen at 6 AM, layering frosting while she paced around my apartment in pajamas, nervous and excited about the day ahead. We ended up talking through half the frosting process, and somehow the cake became part of that memory—not just dessert, but a moment where we stood together before everything changed. People asked for the recipe that night, but what they were really asking for was that feeling.
Ingredients
- All-purpose flour (2 ½ cups): Sift it with the cocoa powder—this matters more than you'd think because it aerates the flour and prevents dense pockets in the cake.
- Unsweetened cocoa powder (2 tablespoons): Just enough to deepen the flavor and give the cake its signature color shift when you add the red coloring; it shouldn't taste aggressively chocolatey.
- Baking soda & salt (1 teaspoon & ½ teaspoon): These two create the slight tang that makes red velvet distinctive, so don't skip or halve them.
- Granulated sugar (1 ½ cups): This is where the cake's tenderness comes from, so measure it generously.
- Unsalted butter (1 cup softened): Softened butter creams with the sugar more evenly; cold butter fights you and ruins the texture.
- Eggs (2 large, room temperature): Cold eggs won't incorporate properly into the batter, so leave them on the counter for at least 30 minutes before starting.
- Buttermilk (1 cup, room temperature): The acidity is crucial; don't substitute regular milk or the cake loses its signature tang.
- Vanilla extract (2 teaspoons total): Use real vanilla; the imitation tastes sharp and synthetic next to the cream cheese frosting.
- White vinegar (1 teaspoon): Another acid that contributes to that velvety crumb and subtle bite.
- Red food coloring (1 ounce): Gel coloring gives a deeper, more sophisticated shade than liquid, and you'll use less of it.
- Vegetable oil (½ cup): This keeps the cake tender and prevents it from drying out as it sits—a secret weapon most home bakers forget.
- Cream cheese, butter & powdered sugar (for frosting): All should be softened at room temperature or the frosting will be lumpy and grainy.
Tired of Takeout? 🥡
Get 10 meals you can make faster than delivery arrives. Seriously.
One email. No spam. Unsubscribe anytime.
Instructions
- Prepare your stage:
- Preheat the oven to 350°F and grease those two 9-inch pans thoroughly—I learned the hard way to use parchment paper circles on the bottoms because even greasing well can betray you. Set them aside and gather everything else, because this batter comes together quickly once you start.
- Build your dry base:
- Sift the flour, cocoa powder, baking soda, and salt together into a medium bowl, then set it aside. Sifting isn't just for show; it breaks up any cocoa lumps and loosens the flour so the final cake is tender rather than tight.
- Cream the foundation:
- Beat the butter and sugar together until the mixture looks light and pale, almost fluffy—this takes about 3 to 4 minutes with an electric mixer. This is where air gets incorporated, which is what gives the cake its tender crumb, so don't rush it.
- Add eggs one at a time:
- Drop each egg in individually and beat well after each addition, scraping down the bowl's sides so nothing gets left behind. The batter should look smooth and slightly increased in volume after the eggs are in.
- Layer in the aromatics and oil:
- Mix in the oil, vanilla extract, and vinegar until the batter looks cohesive. The oil might seem like a lot, but it's what keeps this cake impossibly moist days later.
- Marry the wet and dry:
- Mix the buttermilk and red food coloring in a small bowl, then add the dry ingredients to the wet mixture in three parts, alternating with the buttermilk mixture and always starting and ending with dry ingredients. Mix only until you don't see any flour streaks; overmixing toughens the cake and you'll feel it in every bite.
- Fill and bake:
- Divide the batter evenly between the prepared pans and bake for 28 to 30 minutes, until a toothpick inserted in the center comes out clean or with just a few moist crumbs. The cakes will smell rich and slightly vinegary, which is exactly right.
- Cool with patience:
- Let the cakes rest in their pans for 10 minutes—this matters because the cakes are still fragile—then turn them out onto wire racks to cool completely. Don't rush this step or the frosting will melt into warm cake and become a sliding mess.
- Make the frosting:
- Beat the softened cream cheese and butter together until they're completely smooth and creamy, then gradually add the sifted powdered sugar, vanilla, and salt while beating. Stop and taste it; it should taste like a balance between tangy and sweet, not overly sugary.
- Assemble with care:
- Once the cakes are completely cool, place one layer on your serving plate or cake stand, spread a layer of frosting over the top, then stack the second layer on top. Frost the outside of the entire cake with the remaining frosting, using an offset spatula to smooth it out.
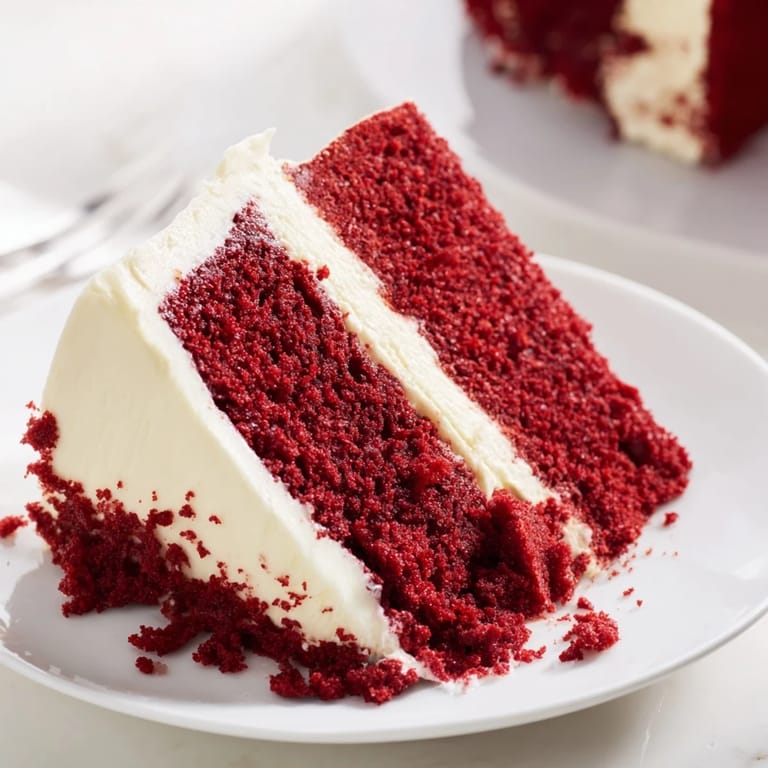
 Save to Pinterest
 The moment someone tastes this cake for the first time, there's usually a pause—that half-second where they're tasting something familiar yet somehow unexpected, trying to name the flavor they're getting. That's the moment I wait for, because it means the recipe worked exactly as it should.
The Secret of the Texture
Red velvet cake is often misunderstood as a chocolate cake that happens to be red, but it's actually something completely different. The cocoa powder is minimal—it's there for depth and color interaction, not flavor dominance—and the combination of buttermilk, vinegar, and baking soda creates an acid-base reaction that produces that signature tender, almost velvety crumb. The oil keeps it moist in a way butter alone cannot, and the combination of butter and oil creates a richness that feels luxurious without being heavy. This is why the ingredient ratios matter so much; even small changes shift the entire character of the cake.
Cream Cheese Frosting Done Right
The frosting is what people remember because it's the contrast that makes the cake shine. Cream cheese provides tang, butter provides richness and spreadability, and together they create something that tastes more sophisticated than buttercream alone. The powdered sugar must be sifted before you add it, otherwise you'll end up with lumps that never fully dissolve no matter how long you beat it. There's nothing worse than frosting that tastes grainy, and that happens when you skip this one small step. The frosting should be light and fluffy, not dense, so beat it longer than feels necessary—your mixer arm gets tired before the frosting gets too thick.
Serving and Storing with Intention
Red velvet cake is best served at room temperature if you want to actually taste it—cold frosting and cold cake both mute the flavors you worked to create. If you make this ahead, keep it in the refrigerator covered tightly, but pull it out at least an hour before serving so the cake can wake up. Store it for up to five days, though honestly it rarely lasts that long. The cake pairs beautifully with something cold and bubbly, or with hot coffee if you want the flavors to feel even more vivid.
- Garnish with red velvet cake crumbs if you want it to look intentional, or with fresh berries if you want brightness against the richness.
- If you're making this for a crowd, you can bake it a day ahead and frost it the next morning—sometimes the cake tastes even better on the second day.
- This recipe doubles easily if you need to feed more people, just use three 9-inch pans instead of two and add a few minutes to the baking time.
 Save to Pinterest
 This cake has a way of marking moments—celebrations feel more meaningful when there's homemade red velvet involved, and the memory of making it with someone often outlasts the memory of eating it. That's the real magic of this recipe.
Recipe FAQ
- → What gives the cake its red color?
The vibrant red hue comes from red food coloring mixed into the batter, enhancing the traditional appearance.
- → Why is buttermilk used in the batter?
Buttermilk adds a subtle tang and moisture, helping to create a tender crumb and balance the cocoa's richness.
- → How can I prevent the cake from drying out?
Ensure not to overbake and allow the cake to cool completely before frosting to maintain moisture.
- → What is the purpose of the vinegar in the mix?
Vinegar reacts with baking soda to help the cake rise and develop a soft texture.
- → Can I prepare the frosting ahead of time?
Yes, cream cheese frosting can be made in advance and refrigerated; bring to room temperature before spreading.
- → What tools are essential for baking this cake?
You'll need round cake pans, mixing bowls, an electric mixer, spatula, cooling rack, and a sifter for dry ingredients.